Table of Contents
User Roles
User Roles Defined
Users can be assigned three different roles within sets and collections in ScholarWorks:
Manager
Managers can be assigned to individual collections under the “Sharing” tab within the Edit View for the collection. Users in this role can add or remove works in the collection, create or edit metadata for the collection, or delete the collection. Users can be added as managers for the entire campus administrative set under the “Participants” tab when editing the set. Users assigned to this role can add, remove, or modify the roles of other users, edit metadata for works within the admin set, modify visibility settings, add or remove files associated with a work, add new works to the set, and manage the set’s workflow settings, including approving works or requesting changes for campuses using a mediated workflow.
Depositor
Users assigned the depositor role for a collection are able to view the collection, regardless of the collection’s visibility settings, and add works to the collection. Users assigned to the depositor role for the administrative set are able to add new works directly to the admin set.
Viewer
The viewer role allows users to view works within a collection, even if the collection’s visibility settings would normally preclude this. They may not modify metadata or deposit new works to the collection. Users assigned the viewer role within the admin set may view works in the entire set regardless of the work’s visibility settings, including works that are private or embargoed.
Regardless of the role assigned to the user, they will only have that role for works deposited after the role has been assigned. It will not retroactively give the user that role for works previously deposited.
Adding Users and Setting User Roles
Admin Set Users
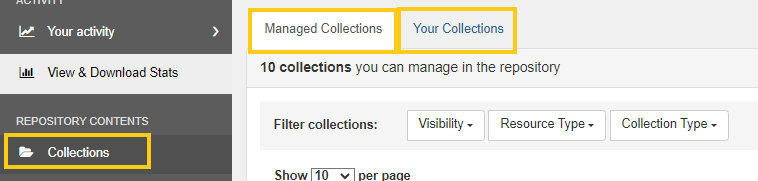
To set user roles for your campus’s administrative set, navigate from the Dashboard using the “Collections” link under “Repository Contents” and select the “Managed Collections” tab.

Find the collection in the list of "Managed Collections": it has type "Admin Set" and will have your campus name in the title. In this example, the admin set title is "Chico" and it is the set of all works deposited by users from CSU, Chico. Click the name of the Admin Set.
After clicking the name of the Admin Set collection, you can see a list of all its contents and an "Edit" button. Click the "Edit" button.

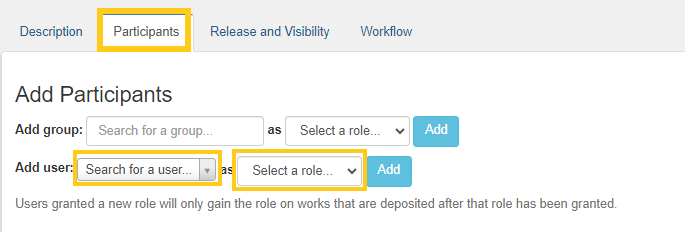
After clicking the “Edit” button, click on the “Participants” tab. From this view, predefined groups of users or individual users can be added to the collection and assigned one of the three roles described in the “User Roles Defined” section of this guide. To assign individual users, first click the “Search for a user” text box, then begin typing the CSU email address of the user you wish to add. A drop-down menu will search for and suggest participant email addresses, which can be used to select the individual you are trying to add. After you have added the user’s CSU email address, use the drop-down menu to assign one of the three roles to the user. Be aware that they will have that role and the associated privileges for all works in the admin set.
Collection Users
To set user roles for specific collections, navigate from the Dashboard using the “Collections” link under “Repository Contents” and select “Your Collections” to find collections you have created, or “Managed Collections” to find collections created by others that have you in a “Manager” role.
Find the collection in the list of “Managed Collections” or “Your Collections” if it was created by you. It has type “User Collection” and will have the collections name. In this example, the collection is called “Chico State Honors in General Education Capstone Theses or Creative Projects”. Click the name of the collection.
After clicking the name of the collection, you can see a list of all its contents and an “Edit collection” button. Click the “Edit collection” button.
After clicking the “Edit collection” button, click on the “Sharing” tab. From this view, predefined groups of users or individual users can be added to the collection and assigned one of the three roles described in the “User Roles Defined” section of this guide. To assign individual users, first click the “Search for a user” text box, then begin typing the CSU email address of the user you wish to add. A drop-down menu will search for and suggest participant email addresses, which can be used to select the individual you are trying to add. After you have added the user’s CSU email address, use the “Select a role…” drop-down menu to assign one of the three roles to the user.
